JB009 - a "different" T-type build

What's Hot
Started sawing timber  for this guitar today - I decided to build it to use up some bits I had lying around - including the neck (Chinese maple Strat neck), pickups (Wilkinson P90 at the neck and Artec rails bucker at the bridge), and most of the timber. Had to buy some hardware and some 2.5mm maple though.

image

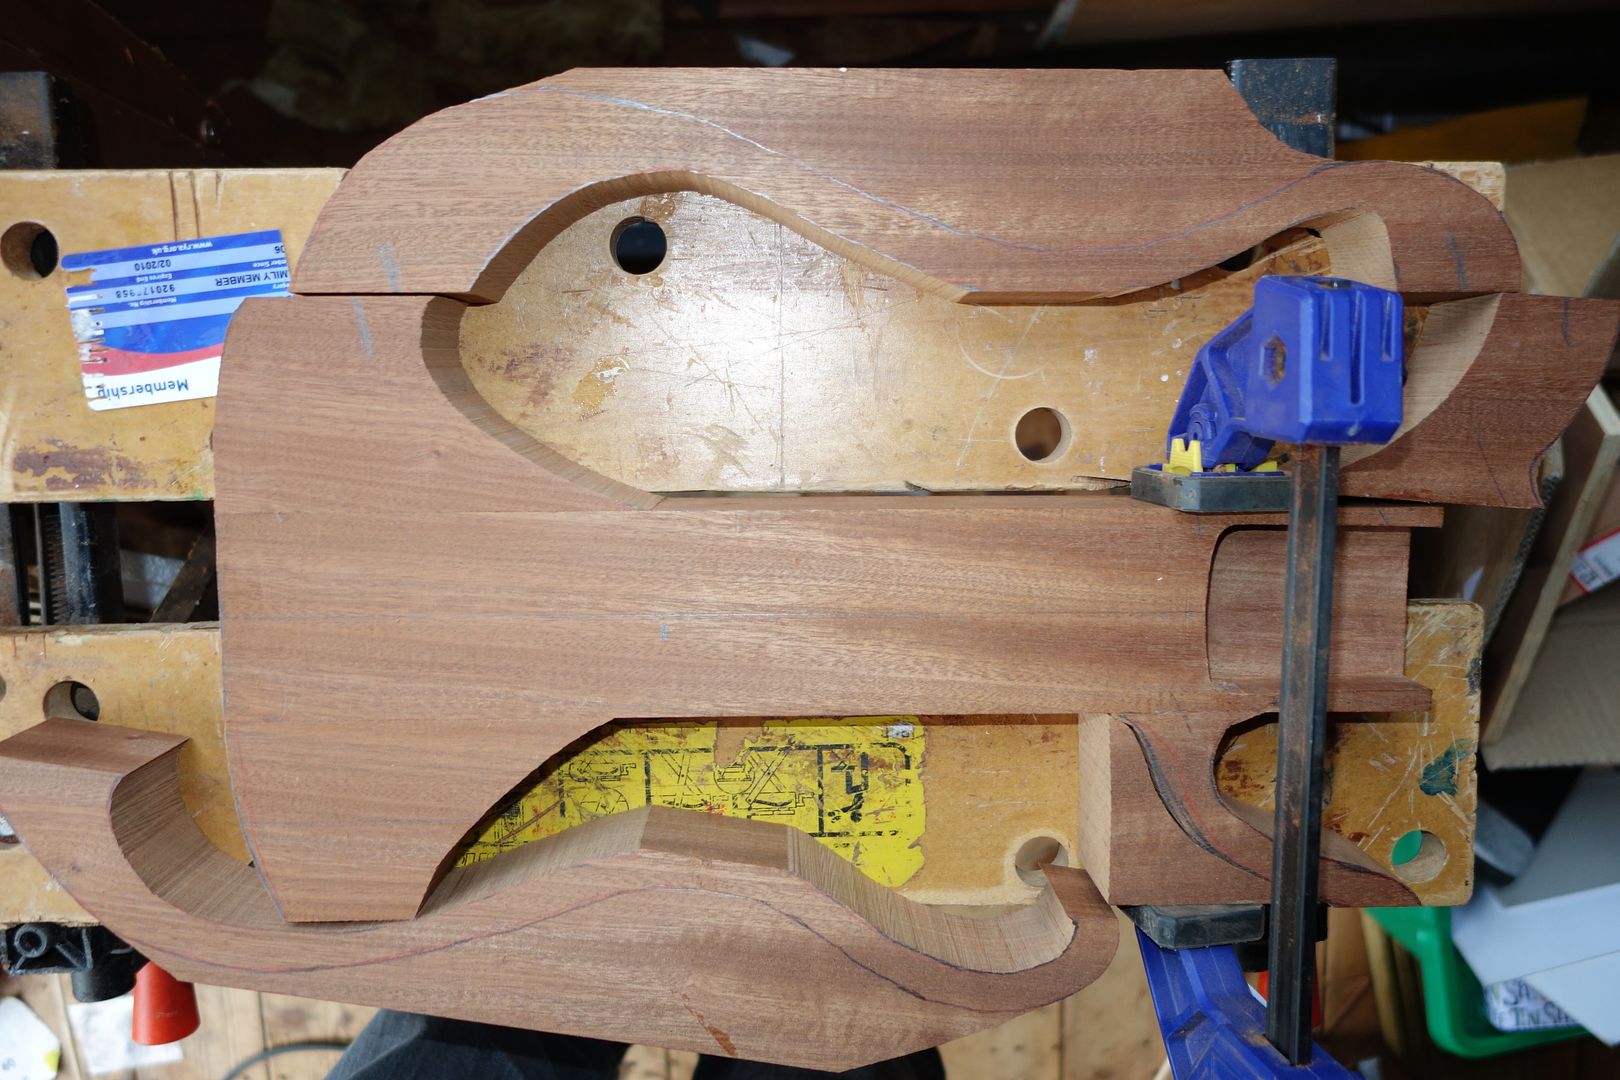
I have left the outside edges on for now to facilitate clamping the body together - these parts will be cut out after gluing, and the centre block will be routed narrower to further relieve the weight. I have left some mass behind the bridge to try to avoid being "neck heavy".  This sapele framework is to support a top and back of 2.5mm maple with a decorative flamed sycamore veneer.  More photos will follow
0reaction image LOL 2reaction image Wow! 0reaction image Wisdom
«1

Comments

  • JohnBJohnB Frets: 121
    I finished the gluing of the parts over the last couple of days. Today I cut the final shape, rough sanded the skeleton, and routed the pickup reliefs.  I have cut the bridge pickup deeper on the side of the controls to allow it to be fitted through the rear control cover. Now the Tele-shape is obvious

    Next jobs - prepare and fit the maple top and back - grain will be side to side to use the directional rigidity, rout the pickup holes through the maple, then add the sycamore veneer (grain top to bottom of course)

    image

    0reaction image LOL 0reaction image Wow! 0reaction image Wisdom
  • SkodadadSkodadad Frets: 509
    Brilliant work, I would love to do this! Can't wait to see the end results
    0reaction image LOL 0reaction image Wow! 0reaction image Wisdom
  • JohnBJohnB Frets: 121
    Skodadad said:
    Brilliant work, I would love to do this! Can't wait to see the end results
    Lets hope it works out - fitting the maple skin isn't proving as easy as I had hoped, the grain stiffness resists bending (which has avoided the need for any bracing) but makes it harder to fit to the contour of the body - lots of clamps on at the moment :-)

    0reaction image LOL 0reaction image Wow! 0reaction image Wisdom
  • JalapenoJalapeno Frets: 6389
    Like it ! :)

    Imagine something sharp and witty here ......

    Feedback
    0reaction image LOL 0reaction image Wow! 0reaction image Wisdom
  • JohnBJohnB Frets: 121
    Got the front and back on - quite difficult clamping as both are slightly curved, pick up routs done, next is to cut the control cavity in the back (I made the template yesterday) and to add the sycamore veneers before finally sanding the edges. To faux bind or not to faux bind that is the question.

    image
    0reaction image LOL 0reaction image Wow! 0reaction image Wisdom
  • Andyjr1515Andyjr1515 Frets: 3127
    Fascinating build. Not sure what advantage you get with this grain direction vs the additional challenges of bending it...I would have thought that the frame inside would provide all the rigidity needed. Mind you, with some of my 'unconventional' methods I'm a right one to speak :)) Whatever, I reckon you're going to end up with a really nice end result.
    0reaction image LOL 0reaction image Wow! 0reaction image Wisdom
  • JohnBJohnB Frets: 121
    I agree Andy. I hadn't really thought through the bending issues. The benefit of ruuning the grain direction across relatively short voids is that the quite thin skins now feel very stiff without internal support. I originally thought more lamination might be needed
    0reaction image LOL 0reaction image Wow! 1reaction image Wisdom
  • Andyjr1515Andyjr1515 Frets: 3127
    JohnB said:
    I agree Andy. I hadn't really thought through the bending issues. The benefit of ruuning the grain direction across relatively short voids is that the quite thin skins now feel very stiff without internal support. I originally thought more lamination might be needed
    Worth remembering that an acoustic guitar's back, sides and top are usually between 1.9mm and 2.5mm thick and are pretty sturdy even where there is no bracing.

    Can't wait to see the veneered finished article! 
    0reaction image LOL 0reaction image Wow! 0reaction image Wisdom
  • JohnBJohnB Frets: 121
    Had a bubble in the veneer today :-( . Reclamped it and hope it goes away as the moisture level from the glue drops (using Titebond cold clamping veneer adhesive). Who had an ironing technique with veneer that might help?
    0reaction image LOL 0reaction image Wow! 0reaction image Wisdom
  • Andyjr1515Andyjr1515 Frets: 3127
    edited October 2015
    JohnB said:
    Had a bubble in the veneer today :-( . Reclamped it and hope it goes away as the moisture level from the glue drops (using Titebond cold clamping veneer adhesive). Who had an ironing technique with veneer that might help?
    Me, probably @JohnB.  I iron on veneer using standard Evostick PVA (applied to both surfaces, allowed to dry, then ironed on) but I would imagine titebond would work too.

    If you still have that bubble, it is worth a try:

    Take an ordinary iron, set on hot.  Protect the patch from scorching with a piece of kitchen roll or similar.  Press firmly at and around the bubble for 5 seconds or so (care not to leave a depression or dent).  Take the iron off and press down immediately over the bubble area with a duster or tea-towel for 15 secs or so until the glue underneath has cooled enough to re-set.

    This can be repeated as many times as necessary - provided there is some glue underneath the bubble, it should hold OK.  If the bubble is, in fact, a crease, it might be a bit more problematic. 

    Hope this helps...
    0reaction image LOL 0reaction image Wow! 0reaction image Wisdom
  • JohnBJohnB Frets: 121
    Thanks - the worst one disappeared overnight when I put the press (bits of wood, clamps and closed cell Karrimat foam) back on.  There was a small one that was really hard and must have had glue under. Reduced it and sanded it level - looks a bit thin but its ok.

    They were on the front and the back veneers went on beautifully, of course.

    0reaction image LOL 0reaction image Wow! 0reaction image Wisdom
  • JohnBJohnB Frets: 121
    Veneer on, stain on, first coat of oil on - when I wet rub the oil with wire wool, I hope the colour will lighten slightly and the grain will get more pronounced


    image
    0reaction image LOL 5reaction image Wow! 0reaction image Wisdom
  • MegiiMegii Frets: 1670
    Looks magnificent! I really like the look of that purple stained top against the natural sapele - unusual, but it really works. :)
    0reaction image LOL 0reaction image Wow! 0reaction image Wisdom
  • Andyjr1515Andyjr1515 Frets: 3127
    JohnB said:
    Veneer on, stain on, first coat of oil on - when I wet rub the oil with wire wool, I hope the colour will lighten slightly and the grain will get more pronounced


    image
    I agree with @Megii - it looks magnificent, @JohnB ; :)

    Ref the wet sanding, with a stain (or ink), you won't be able to do the full slurry approach...the stain only soaks into the very very top surface except at the end grain so yes, the light bits will lighten, but you may find yourself rapidly back to bare wood...and with no way of being able to re-stain without sanding it ALL off and starting again...

    You can try it, but go VERY gently and as soon as it lightens a bit too much stop immediately.  Personally, I would leave it well alone...it looks great as it is and any further coats of oil will further deepen the colour and lustre.
    0reaction image LOL 0reaction image Wow! 0reaction image Wisdom
  • JohnBJohnB Frets: 121
    I took a chance with the wet wire wool rub - kind of got the effect I wanted but it is not as even as I had hoped
    0reaction image LOL 0reaction image Wow! 0reaction image Wisdom
  • JohnBJohnB Frets: 121
    Had another go, I think I have got away with it and the surface is much smoother

    0reaction image LOL 0reaction image Wow! 0reaction image Wisdom
  • Andyjr1515Andyjr1515 Frets: 3127
    Excellent. Well done :)
    0reaction image LOL 0reaction image Wow! 0reaction image Wisdom
  • SkodadadSkodadad Frets: 509
    Fab work, what a beauty!
    0reaction image LOL 0reaction image Wow! 0reaction image Wisdom
  • axisusaxisus Frets: 28337
    looking superb!
    0reaction image LOL 0reaction image Wow! 0reaction image Wisdom
Sign In or Register to comment.