
Howdy, Stranger!
It looks like you're new here. If you want to get involved, click one of these buttons!
Categories
- 243.5K All Categories
- 22 >> Start Here <<
- 12 New Members
- 8 FAQs
- 87.3K Gear
- 39.8K Guitar
- 3.4K Acoustics
- 1.3K Bass
- 14.8K Amps
- 17.3K FX
- 295 Digital & Modelling
- 768 Other Instruments
- 8.3K Making & Modding
- 425 Gear Reviews
- 107 Guitar Reviews
- 74 Amp Reviews
- 119 FX Reviews
- 87 Other Reviews
- 750 Made in the UK
- 977 Theory
- 1.9K Technique
- 2.2K Live
- 3.2K Studio & Recording
- 2.1K Making Music
- 225 Events
- 15 Guitar Show 2018
- 842 Plug My Stuff
- 106K Classifieds
- 41.4K Guitars £
- 2.9K Acoustics £
- 141 LH Guitars £
- 903 Basses £
- 10.6K Parts £
- 18.5K Amps £
- 34.3K FX £
- 2.8K Studio & Rec £
- 6.1K Misc £
- 466 Personnel
- 55.1K Chat
- 36.8K Off Topic
- 1.1K Tributes
- 6.6K Music
In this Discussion
Become a Subscriber!
Subscribe to our Patreon, and get image uploads with no ads on the site!
Build thread - carved top LP
 TTony
Frets: 27850
TTony
Frets: 27850
I'd posted a lot of this on the other forum ... so apologies for the repeat, but hopefully you'll get to see it finished over here.
Having trouble posting images here? This might help.
0 LOL 0
LOL 0 Wow! 0
 Wisdom
LOL 0 Wow! 0 Wisdom Base theme by DesignModo & ported to Powered by Vanilla by Chris Ireland, modified by the "theFB" team.
Comments
Time to try something a bit more adventurous ...
Here's the top, routered to thickness. It's thick (a little over 20mm) and one piece. It's been drying for the last few years, since I bought a couple of freshly-felled planks at a local wood fair.
It bowed (side to side) a bit as it dried out, so I've taken almost half the thickness off it to prep it as a cap. This is the probably the least attractive piece - the rest has a more even grain pattern. So if this one goes well, expect to see some more Walnut capped guitars from me.
I've had the body blank sat in the workshop for years. I'd forgotten what wood it is .. I'm now told that it's Idigbo. As you can see, it's very plain (I'd been thinking that it was Sycamore).
Ready for gluing. The holes you can see are screw holes. I thought it can't hurt to screw the pieces together as well as clamping?
It's now at this stage ...
That's 16kgs of water softener salt on the top as well as the clamps as well as the screws. Will take a look in the morning. I also used a brand new and fresh bottle of glue, so it had better stick nicely.
The plan is for a carved top LP style guitar. With the thickness of the cap, I've got plenty of scope for a full carve. I'm thinking of freehand router-ing a rough carve once I've drawn the contour rings on the top in increments of 2-3mm, and then finishing with the normal handtools.
Cut out nicely. I've just bought a couple of 1/2" router bits. They eat - EAT - anything!
This is the plank of Walnut that the top was cut from. This plank should provide another couple of tops. And then I'll start on the second plank.
So expect to see a few Walnut-themed builds from me in the coming months ...
It's English Walnut, so not as bad to work with (or poisonous to other plants) as the American Black Walnut.
Scope for a bit of a carve there! 21mm of scope. I'm planning on taking it down to c7mm at the edges, which will give a thickness at the edge of around 40mm, and 54mm in the uncarved middle. It's not too heavy though.
No idea whether my freehand routing skills are up to the challenge, and I'm too tired to find out today. I discovered a while back that there's an inverse relationship between my woodworking skills and levels of tiredness. So, that's a job for tomorrow.
I thought I might make the challenge a bit more interesting by carving in a flat area where the vol & tone controls will go, probably at about 17mm. Can't visualise all the transitions at the moment (see comment about tiredness levels!), but I don't see why it wouldn't work, and it might even look good.
I'm now getting on with some procrastination. Not that the prospect of taking a router to that top is in anyway scaring me .
Yup, the inner most ledge shouldn't have been routered - that ledge only reaches that depth where it meets the next ledge down, not where it meets the top of the body.
Still, the piece of scrap would never have made a good guitar (joke - it was a piece of leftover constructional pine from when we built the summerhouse last year!). It'll do much better on the fire one evening.
Patient is masked up, and ready for the operation.
The masking tape is just there to highlight the carve line, and to give the non-carved top a bit of protection against slipping rasps!
That was surprisingly quick. Perhaps 45 mins. I spent longer trying to make the templates for the router carving!
And the other side is initial-carved too.
This is a sketch of a cross-section of the shape I'm working towards;
I drew this out when I was still thinking of using a router. Hence the "cut depth" measurements.
So far, I've rasped the straight diagonal line. I'll now use some shaped chisels and cabinet scrapers and sandpaper to try to form the two-stage carve into the top
It's slow, but (slow) progress is being made on carving the top ...
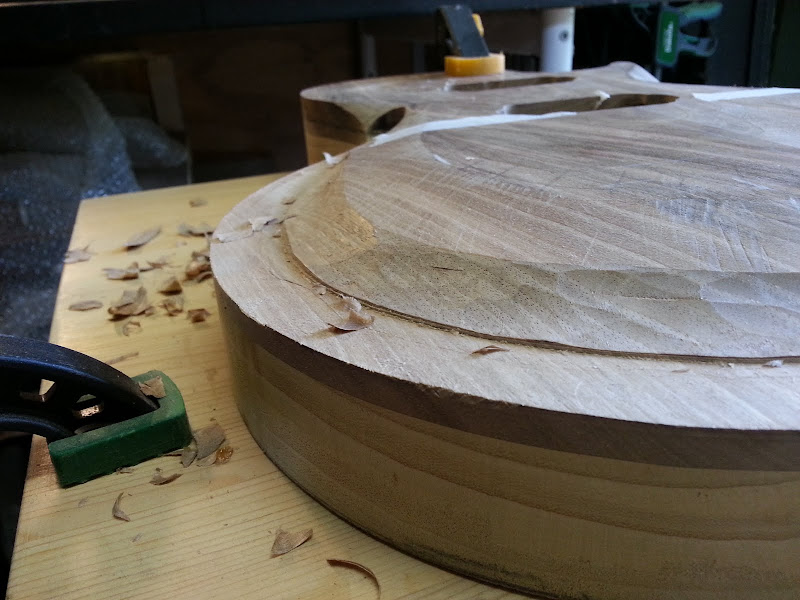
I'm still aiming at the combination of curves that I drew out ... ambition!
Oh, and I partly changed my mind again in the power tools vs hand tools debate.
What's the best way of getting a nice, flat, even edge all around the outside of the guitar? Use a router of course. So that's what I did. The carve to transition from the nice flat even outer edge to the nice flat even central top of the guitar will be done by hand though.
Still got a couple of curve transitions to work out, and also thinking that the top is so thick, maybe I should take 2-3mm off the top too.
The walnut was surprisingly easy to work. Luckily, as I've done it without use of power tools so far - just lots of chisel/gouge/sandpaper work!
So I'll be starting work on the back next, then tidy up the sides.
It'll be another Wudtone finish - I just don't know which one yet!
So, I've started staining it;
That's the first coat of Wudtone Amber stain. I'll add some gold highlight before the next coat, and finish it in gloss.
* yes, "ready" apart from drilling the holes for the bridge.
And where we are today ...
Well, turns out that routing out the pickup cavities with a 1/2" bit isn't the best of ideas, as the bit doesn't get properly into the corners of the template. So it doesn't take out enough of the wood. So the pickups don't fit.
This guitar-building, eh ... you can see why Gibson have so much trouble.
Not fatal though.
So I inserted the correct router bit, re-applied the template and cut out the cavities properly.
Took off the template so I could get the right depth ... and that's all good. The pickups now fit fine.
But the base of the router scratched the top when took the template off and ran the router base across the top of the body. Which was a dumb thing to do.
So I'll need to sand it back a bit and re-stain. But I'll fit the neck first, and then decide whether to use a wrapover bridge or a separate bridge and tailpiece. That'll be influenced by how accurately I've cut the neck angle and hence the bridge height needed to get the action right.
I have drawn it all out as a side elevation plan, but I'd still like to see it with my eyes before I make the decision and drill the big holes!
So, stay tuned folks, more to come on this one.
Thanks Mr ourmaninthenorth!
I love building the things. I do it only for my own satisfaction, which is immense when I recall (and my wife regularly reminds me) that I couldn't saw a piece of wood in half with c*cking it up until about 6-7 years ago.
Now I can build guitars, from raw lumps of wood.
This is what (who) made the difference;
http://www.youtube.com/watch?v=Jf__7SybvGo&feature=share&list=PLE2EFC3A5E7887D33
It's Wudtone again - this time it's their "Amber" kit, with gold highlights. The gold hadn't been applied in the pic above - but even now it is applied, you have to catch the angles just right to see it - it's a really subtle effect.
Posting the thread on here is partly a bit of a self-applied kick up the backside for me ... I've done little work in the workshop for the past 2-3 weeks ... now I'm going to have to get on with it again.
Good to see you here Adam.
I was quite serious - if I tried to cut a piece in wood, in half, I'd cock it up.
Mark showed me (a) that I could make a guitar and (b) how to make a guitar.
If you've ever thought about making your own, if you even think that it might be interesting to talk to someone about perhaps doing it, sometime ... Mark will make it happen for you. Pre-existing wood-working skills are absolutely NOT necessary.
I'll stop the evangelising now.
It's amazing how far a few days of really good tuition can take you.