

Howdy, Stranger!
It looks like you're new here. If you want to get involved, click one of these buttons!
Categories
- 241.7K All Categories
- 22 >> Start Here <<
- 12 New Members
- 8 FAQs
- 86.7K Gear
- 39.5K Guitar
- 3.4K Acoustics
- 1.3K Bass
- 14.6K Amps
- 17.2K FX
- 270 Digital & Modelling
- 765 Other Instruments
- 8.3K Making & Modding
- 421 Gear Reviews
- 107 Guitar Reviews
- 73 Amp Reviews
- 119 FX Reviews
- 87 Other Reviews
- 749 Made in the UK
- 975 Theory
- 1.8K Technique
- 2.1K Live
- 3.2K Studio & Recording
- 2.1K Making Music
- 219 Events
- 15 Guitar Show 2018
- 830 Plug My Stuff
- 105.2K Classifieds
- 41.1K Guitars £
- 2.8K Acoustics £
- 138 LH Guitars £
- 899 Basses £
- 10.5K Parts £
- 18.3K Amps £
- 34.1K FX £
- 2.8K Studio & Rec £
- 6.1K Misc £
- 465 Personnel
- 54.7K Chat
- 36.5K Off Topic
- 1.1K Tributes
- 6.6K Music
In this Discussion
Become a Subscriber!
Subscribe to our Patreon, and get image uploads with no ads on the site!
How To Jookify Your Guitar - A Blog of Sorts
 JookyChap
Frets: 4234
JookyChap
Frets: 4234
Adventures in Self-justification: In The Beginning...
I always wanted a Paisley guitar. I think it was watching James Burton with Elvis, or maybe seeing StickyFiddle managing to squeeze pictures of his pink baby into every conversation, back in the old days of Music Radar, (remember that? Seems so long ago already.)
Whichever it was, I wanted one, but like many things GAS > Dosh and it never seemed to happen, so I thought I'd try and find a way to make one myself.
Looking around, it was a lot easier to find paisley fabric than the paisley wallpaper Fender used on their guitars, so that looked a winner, and I've never been interested in making clones, so putting my own spin on things was a groovy good opportunity to have some fun too.
So I had a plan and hit Ebay to find
some nice fabric.
But how to do it....?
Or more to the point how to do it and end-up with a half-decent looking guitar and I must admit I was a little worried that wrapping a lovely guitar body in glue, 100% cotton and lacquer would have a detrimental (rather than simply mental) affect on it's tone.
There was also the slight issue that I had never made a guitar before – one 'interesting' attempt at a guitar kit a few months earlier being my total exposure to such things. But how hard can it be?
So like all good scientific-minded pioneers, I just went for it and figured I could see how it turned out and work backwards to a point where I could claim that I knew what the answers would be before I started.
Retro Justificationem, as those people in Latinland used to say.
But even chancers need to experiment a little and I got some scrap wood (actually the kitchen table) and used various gloopy gubbins to stick strips of material to it until I found a combination that worked well, looked good and was impossible to remove.
I am still apologising about the ones that haven't come off, buying a table protector and chintzy table cloth have never truly got me out of trouble on that score.
And in truth, my first adventure in paisley was very much a forum type of thing. I wanted it to be equally a cool guitar and a 'found art' kind of trip, so I set out to buy as many of the parts as I could second-hand in the Classifieds – which was as clever as taking your first taste of crack - and as has been the case on a good 50% of the guitars I've made since, the body and neck both came from DrBob, from projects he had intended to make but never gotten around to...
In this case there was a lovely Strat body and a neck with a headstock fashioned to look like a Suhr, whatever that is.
It also was destined to have a single Soapbar P90, taken from a PRS SE and other bits 'n' bobs I picked up as I went.
I even wanted to build-in a fuzzbox.
I wasn't over-ambitious at all.
And somehow, with lots of stupid questions patiently answered by people like WezV, Sporky and many others I forget (although routing with a chisel was very much my own idea) the guitar got made and worked beautifully.
Eventually.
But the biggest trip was getting the body covered in a beautiful, colour-oozing paisley called 'Woodstock', and it was that rather than me attacking the body with said chisel that made it stand out. Somebody even bought it, which surprised me somewhat, and so it goes.
So why am I blathering on here and now?
Well, I don't do the fabric thing any more, but I have been asked many times how it is done, so this seemed the perfect place to do a little how-to, so it is there for future generations of chaps and chapesses to ruin their clothes with glue but hopefully end-up with a unique guitar to impress their friends and stun fellow musicians with.
Once they stop laughing,
But they are only jealous,
we all know that..
The Plan
Over the next few days then, I'll do a bit of a blog on here that will take you through the various steps and show you how to make your boring old guitar pretty gorgeous too.
It is incredibly easy, costs next to nothing and is quite fun, so hoping thee will like it lots..and if you don't, well clearly you don't get it.
It is art baby and you either get it or you are square and, err, well, there we are.
La la laaa
1 LOL 3
LOL 3 Wow! 0
 Wisdom
LOL 3 Wow! 0 Wisdom Base theme by DesignModo & ported to Powered by Vanilla by Chris Ireland, modified by the "theFB" team.
Comments
Day One: Begin The Begin
Before we begin like the fastest milky in the West, it is always wise to have a plan.
People like plans, they know where they are.
For these bits of Jookification, I am reliant on the charity of strangers, and very lucky that @TTony and @John_P of this fine place are supplying a couple of guitar bodies for me to mangle.
John_P is supplying a Strat body, which will be used for this piece of Jookiness, whilst TTony has offered one of his own creations, which will eventually be auctioned for the good of the forum's finances, which is tres cool. That is destined for a bronze and acid bath, which I'll cover in another thread.
But to the plan.
For John_P's Strat, I decided to do two stages....
Step 1 : Paisleyification:
This will give us a paisley fabric finish, and it doesn't get more groovy than that..
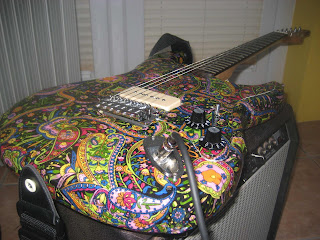
As you can hopefully see in the photo, I've grabbed a nice casual, yet quite attractive paisley from Ebay for about a fiver. The best results tend to be if you use 100% cotton so I'd stick with that as a rule of thumb.
Fabric tends to be sold in Fat Quarters, and a single one of these will just about cover a Strat or Tele body, although I usually buy two (a chunky half?) to be on the safe side.
How do we stick it on the body then, eh?
There are many ways to do this, and I think I've tried most of them, but the easiest (without dipping into chemistry lessons) is to use an American product called Mod Podge, which not only works well at sticking our paisley fabric to the guitar body, but will also act as a grain filler.
This will give us a nice smooth finish and be pretty stable, before we give it a final few coats of lacquer to seal the Jooky goodness in.
What is this Mod Podge of which you babble?
Well, it basically is a watered down PVA glue, but also has a few more ingredients that give the smooth finish and some kind of varnish that gives a shiny gleam. You can also sand it between coats to get a really flat result, which in this case is what we will be doing.
There are various types of Mod Podge available, and it is generally used by middle aged American women to stick pictures on boxes for some reason, with different flavours including glow-in-the-dark and glittery, but I've gone for the basic gloss this time for simplicity sake.
One pot costs about a fiver and will do a single guitar easily.
Step 2: Gilding
To make this a bit more interesting, once John_P's body has been prettified, I thought it would be nice to give it a gold top and basically cover it all up.
I know it makes perfect sense.
To do this, in the second stage I will use some imitation (schlag) gold leaf to cover the top of the guitar, which is one of the reasons why I will be making sure that the paisley is completely flat in this case.
Once we have the gold on, the next stage will be to use a weak acid to dissolve some of the leaf (this wouldn't work with real gold, btw, hence the use of a schlag) so that we will be able to see the paisley peeping thru.
This is a nice effect.
People may applaud.
In my head anyway.
After both stages have completed we'll give it a light coat of lacquer for protection.
Day 2 – Preparing The Body
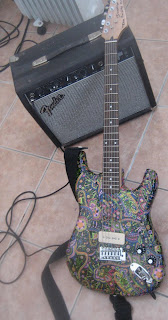
Well, we've got all the bits, so it really is time I started to do something with them.
As you can see, the body @John_P sent me to Jookify, had previously been finished in black nitro and has a good natural relic thing going on. Normally at this point I would either strip it back to the wood, or as it is black (which might show thru the fabric when we get that far) give it a coat of white or silver paint, as a lighter background will show the colours off better.
This time though – mainly as the body isn't mine and if John hates the final result he may want to go back to the nitro – I'm just giving it a really light sand so that the glue we will use has something to stick too.In truth this needs very little sanding and the Mod Podge is quite inert so there are no worries of chemical conflict, so all I needed to do was take the shine off with some wire wool then remove the debris with a micro fibre cloth. Five minutes end of story.
Day 3 - Cutting Thy Cloth
Next, we turn our attention to the lovely paisley fabric. I think I said before that 100% cotton works best, though a slightly thicker cloth would have been ideal with a darker body.
First steps are simple, we are going to cut out two pieces of cloth, one for each of the front and back of the body.
This only needs to be a rough outline and I just mark around the body with chalk and cut three inches outside of the line – mainly because I will always cut it with the wrong side down (annoying) but also because I want to have enough excess fabric to reach around the sides and meet somewhere near the middle.
It is really useful to keep all of your offcuts dry and to one side, as later life is a lot simpler if you can 'patch' the odd place that doesn't overlap, especially around the neck pocket on a Strat.
Getting Sticky On It
Well, the foney war is over and it is time to get tacky in oh-so-many-ways, but first it is well worth giving the body a wipe down with a damp cloth and another final check with a micro fibre. If we are going for a flat finish this avoids unsightly bumps and princess and pea moments further down the line.
All clear? Well, grab your trusty paint brush and cover the top of one side of the body with the Mod Podge. This first coat needs to be quite gloopily applied, but avoid going over the edges and onto the sides of the guitar (you'll thank me later if you do).
Next take you piece of paisley loveliness and gently place it on top of the body so that it drapes over the edges equally all around the body. Rub the fabric all over so that is all in contact with the glue/body and as flat as possible.
At this point it is all about making sure that there are no wrinkles or bubbles in the fabric (unless you want them – sometimes they look nice) and I usually use an old credit card to scrape over it, working from the middle outwards to stretch the fabric. If it isn't going well, no worries, the Mod Podge stays tacky for a while and you can easily peel the fabric off and try it again.
Don't worry about covering up the routings for pickups, neck pocket etc. at this point, we will cut those out later.
Filling Granny.
OK, it is the grain rather than granny, but I figured we needed some more net traffic.
So we have our nice piece of paisley sticking to the body, but it still looks like an old hankie, but worry not, this is where we do something about it.
Next step then is to paint more of the Mod Podge over the fabric as it cleverly will act as a grain filler and give us a nice flat surface. You can use other grain fillers and some of them will give a better result, but in the interests of keeping this easy and cheap, we'll stick to the Mod Podge.
As before the first coat we'll put on needs to be relatively heavy. Getting it on is simple, just use your trusty paintbrush. For a better result I tend to scrape off the first coat using a much declined credit card – I have many – again working from the centre out to the edges, before giving a second lighter coat immediately afterwards. Leave this for about half an hour or until it is dry (the white will go transparent is how you will know).
Once this coat has dried, it is a simple cases of adding four or five more coats, leaving each to dry. As we are building this up you will notice brush marks in the finish, but these are easily removed by giving the body a light sand using 1200 grit paper between coats or once they are all done if you prefer. You will have noticed that the soft cottony fabric has turned quite hard and plastic (in the truest sense).
At this point we could leave the finish as the Mod Podge includes a varnish that will give a nice gloss, but for extra protection in the long term it is best to give it a coat of lacquer.
Short Back and Sides
Once the top is done, we need to repeat the previous couple of step for the back and sides.
The back will prove no problem, but the sides can be a bit tricky as you will need to either meet the fabric from top and back in some sort of seam or overlap, or otherwise get a flat finish.
I've tried many ways to do this, and my favourite is to cut the overlapping fabric into short strips – about an inch wide – and stick those on in an interlocking pattern. Generally I like to retain the look of fabric and so have a few ruffles here and there, but with a bit of patience it is easy enough to match things up so that it seems seamless.
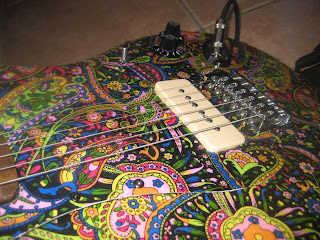
Once the entire body is covered and filled, now is a good time to uncover the pickup, bridge and neck pocket routings. This can be left until after the body has been lacquered – and in some ways it is easier to do it that way – but playing the percentages, it is a lot easier to fix things if they go wrong before it is set in stone.
Opening up the routings then, is quite simple. As you can hopefully make out, most of them are obvious as the fabric will have dipped into them as the Mod Podge has dried. So find yourself a sharp Stanley knife with a few spare blades and slowly cut them out. Doing this is easy enough, but take your time as it is dead easy to cut too much. It is best to keep some tension on the fabric as you cut and it works best if you take a couple of passes as you move toward the edges.
If at this point you do slip, the remainder of your Mod Podge and those scraps of fabric you held onto will suddenly become your bezzy mates.
And Finally?
So we have the body covered, cavities exposed, all that is left to do is lacquer the body and make it as neat and shiny as you want it to be.
Before doing that – and Nitro, acrylic or Halford's Tinnies will all work fine – give the whole body a final going over with wire wool for a smooth finish.
If we were just paisleyifying this body, that would be that and it would look quite pretty.
This time we're going to do a bit more, so I won't lacquer it yet...
Very glad you like it @John_P
It almost seems a shame to cover up the paisley, but a bit of gaudy gold never hurt, did it?
That is so much "not my thing".
And yet, I find myself thinking that it looks ok .... or even better than OK.
Have I spent too much time in the sun today??
Just been mixing some copper and aluminum powder in acrylic to put on your body
(Please don't take that as a threat)
That's a mistake right there.
Oh yes, gotcha.
It's not my body ... it's all yours
I shall be watching with interest ....
Nowt more scathing than a 7-year-old critic...