

Howdy, Stranger!
It looks like you're new here. If you want to get involved, click one of these buttons!
Categories
- 241.4K All Categories
- 22 >> Start Here <<
- 12 New Members
- 8 FAQs
- 86.6K Gear
- 39.5K Guitar
- 3.4K Acoustics
- 1.3K Bass
- 14.6K Amps
- 17.2K FX
- 266 Digital & Modelling
- 765 Other Instruments
- 8.3K Making & Modding
- 420 Gear Reviews
- 107 Guitar Reviews
- 73 Amp Reviews
- 118 FX Reviews
- 87 Other Reviews
- 748 Made in the UK
- 972 Theory
- 1.8K Technique
- 2.1K Live
- 3.2K Studio & Recording
- 2.1K Making Music
- 218 Events
- 15 Guitar Show 2018
- 829 Plug My Stuff
- 105.1K Classifieds
- 41K Guitars £
- 2.8K Acoustics £
- 138 LH Guitars £
- 895 Basses £
- 10.5K Parts £
- 18.3K Amps £
- 34K FX £
- 2.8K Studio & Rec £
- 6.1K Misc £
- 465 Personnel
- 54.7K Chat
- 36.5K Off Topic
- 1.1K Tributes
- 6.6K Music
In this Discussion
Become a Subscriber!
Subscribe to our Patreon, and get image uploads with no ads on the site!
1Q22 Build Challenge - FINAL SCORING and BEST PROJECTS REVEALED!
 downbytheriver
Frets: 1049
downbytheriver
Frets: 1049
Please post your finished project here (with pics and salient description). To keep this thread clean please refrain from comments. Comments can be left in individual build threads.
A link to your build thread is recommended.
0 LOL 0
LOL 0 Wow! 0
 Wisdom
LOL 0 Wow! 0 Wisdom Base theme by DesignModo & ported to Powered by Vanilla by Chris Ireland, modified by the "theFB" team.
Comments
Thanks to
@GSPBASSES for the guitar and bridge
Halfords for the Matte Cammo Green Paint
TruOil for the neck and over the paint
Duesenberg for the Les Trem
Iron Gear for the Blues Engine, from which I removed the chrome cover
CTS pots
Kluson for the tuners
Tim at Scratch It for the custom scratchplate
Any comments in the build thread please!
https://www.thefretboard.co.uk/discussion/221476/1q22-challenge-paulnb57-mm-lp-done#latest
1Q22 Build Project, Andy K's RPi / Reaper recording studio
2 part build, initial OS set up detailed here :-</p>
https://www.thefretboard.co.uk/discussion/219924/1q22-challenge-raspberry-pi-reaper-recording-studio#latest
Final build ( completion ) detailed here.
My initial plans, to do something a bit different, and a bit challenging for me, were sidetracked due to global supply shortages, and I had to start my challenge on whatever was available, the Raspberry Pi 400, which enabled me to concentrate on the software side of the project, getting used to a new OS and seeing if what I had planned was even possible.
The RPi exceeded my expectations in this regard, and after a few hiccups early on, I found myself getting used to the OS, and being able to get a bit of a grasp on what goes on under the hood.
In my initial build thread, I reached a point where I had already met some of my goals, to be able to use the Pi to record and mix some of my projects, and when I recently managed to source a 4 gig version of the original Pi, I decided to complete my original plans, by building the Pi into a case that I had earlier sourced, which has dedicated hardware for high quality audio use.
A couple of pictures here show the ‘build’ from a pile of parts, and hopefully this gets me back to the point I left off my original thread, by simply using the same SD card and OS in my new machine.
Parts—----
Build process—------
Complete —------
Connected / running —-----
Conclusions—
This project is ongoing, and forms the basis of a part of my workflow into the future.
There are obviously limitations in what can be achieved with this machine, but I have proved to myself that it could be done, and maybe somebody else can use the idea to get into recording / mixing on a very low budget indeed.
I had a list of goals with this project, and I can sum it all up as follows…..
1, can I build a recording studio from a Raspberry Pi ?
Definitely, recent advances with Reaper software make it easy to cross from one platform to another, Linux has always been an alternative OS, but modern builds make getting into it a lot easier.
2, Can it actually function well to record and mix music on?
Absolutely, the OS is designed to automatically detect many USB IO without the need to install drivers, and once one is familiar with how this is managed in Reaper, it is easy to monitor and record via an interface. The RPi has enough processing and Ram to be able to function well in playback and low latency recording. Plugin support has always been limited on Linux, but native Reaper JS plugins can perform the same functions admirably.
3, Usage,
It was a challenge to find ways to have the OS work as something that can be displayed on a TV, from a seating position across the room.
Part of the intention was to be able to use this machine as a way to showcase and collaborate with a room full of people, eventually I got that done with a combination of some scaling tricks in both the OS and inside Reaper.
The use of wireless keyboard and mouse enabled control from a distance, and within Reaper I was able to configure tablet and phone controls to perform functions from touch screens and icons, Reaper Remote and WRB allowed 2 devices simultaneously, with 2 menus to perform playback, recording and monitoring from a distance.
Recording performance was always going to be a compromise on such a limited machine, but for simple mic’d and DI recording, there is ample memory and processor resources to do this at low enough latency to achieve good results.
4, Sound output.
For precise mixing, studio monitors can be used via IO, but for reference and general listening it is useful to play back via the TV’s HDMI, or any connected BT device.
My choice of case for this project has an integrated headphone amp, and DAC for HD audio, and this can easily be output to a home stereo setup for the best possible audio quality.
A dedicated OS can be used to use the machine as a headless audio streamer for playback of streaming services or a library of music stored on connected drives, or network storage, so this is added functionality to my original plans.
5. Conclusion.
This project was planned as something to take me out of my comfort zone, and as a way to pass some difficult time, and actually learn something useful along the way.
It has helped me get back to some of the core things that have to be understood for both music production, and PC use in general, so it has been very worthwhile for me.
I hope that my efforts might help somebody else in the future, if they decide to follow the same sort of path.
Build thread:
https://www.thefretboard.co.uk/discussion/220775/1q22-challenge-lapsteel-tele-scopic
Nut, bridge and string post from Black Dog Music
Fretboard found through E-Bay
Di Marzio Noiseless Pickup from a swap involving a Fender Super Champ XD amp
Other hardware from a Squier Mustang
I had a great time and learned many things. I'm so impressed with all the projects and builds that are also taking part in this challenge.
Harley Benton Jazzmaster style kit. Only really added some bevelling to the body, reshaped headstock and finished in a nice metallic blue. Lovely kit overall and would recommend. Body is quite light but it is balanced. Neck is finished with tru-oil. Stuck with the kit electrics/pickups for now although may upgrade pickups. I think white pickup covers/knobs may stand out nicely.
https://thefretboard.co.uk/discussion/225073/1q22-challenge-make-somefink-look-pretty#latest
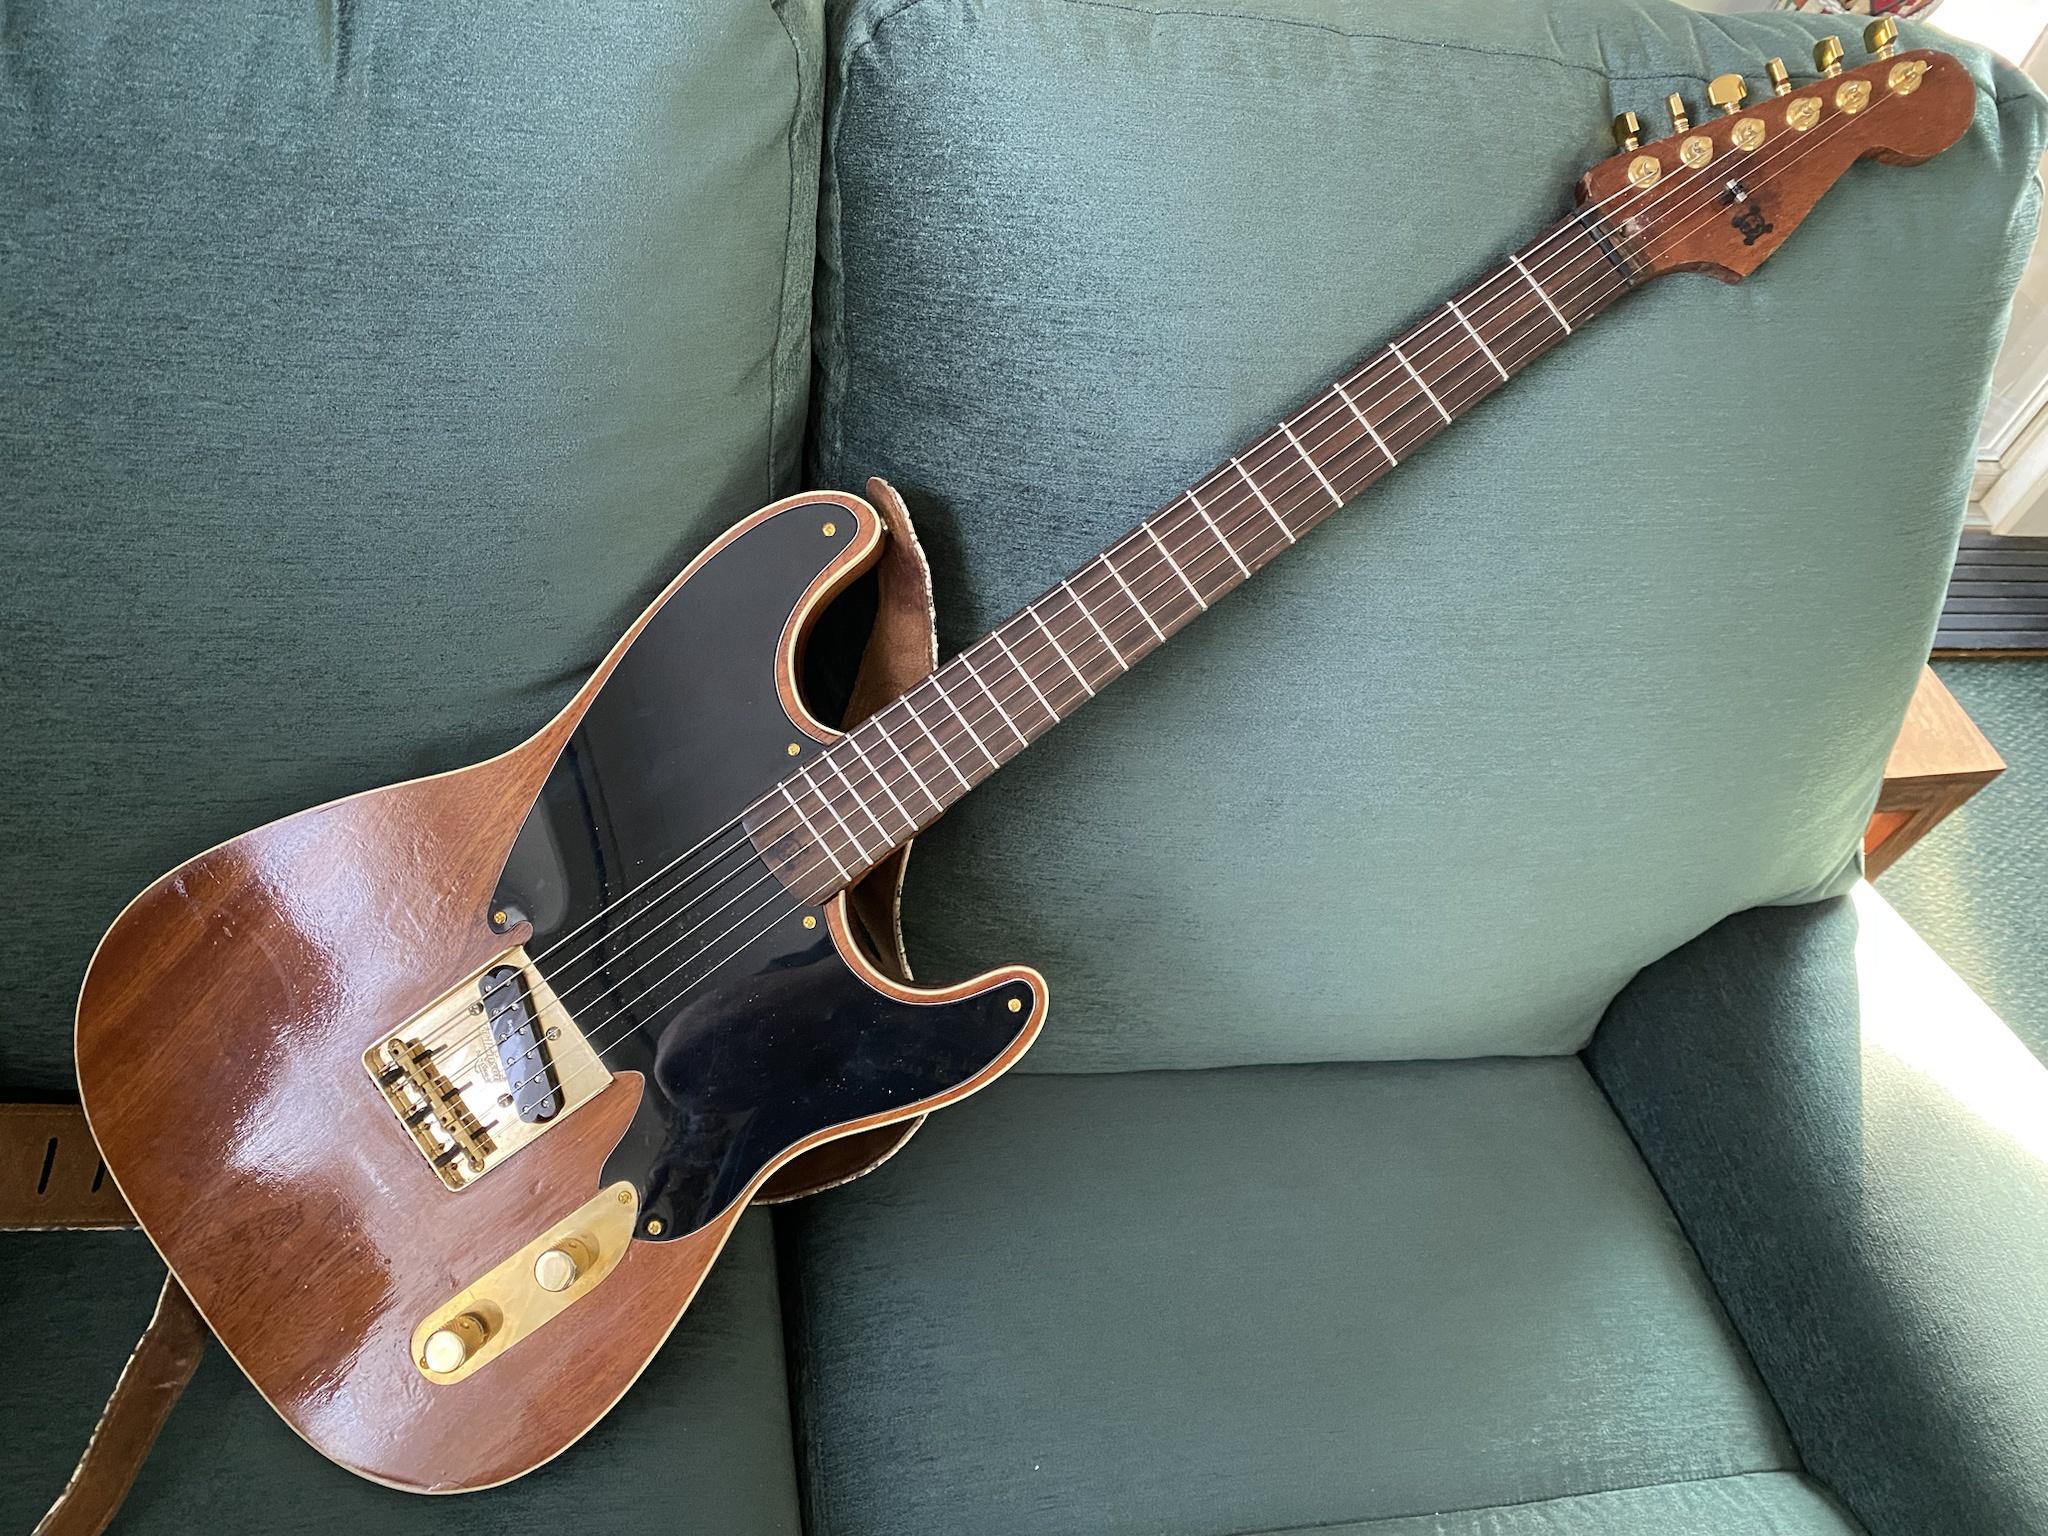
Title: De-Constructed Tele
Concept: A sort of play on the way trendy chefs present traditional dishes in different guises that actually don't change the ingredients or taste at all!
This was very much a learning curve for me so let me simply say I tried to embody the 'constituent separation' implicit in the title by separating the three sections;
Guitar totality maintained not by pounding rods through from outside but 'hiding' the jointing by high-tech adhesive (without which the thing would have fallen apart) and solid stainless steel rods - note, one strap button attached to each section of the body;
To increase the separation characteristic by treating one part of each 'split' in light tone with gloss top coat while the other is in deep dark stain and matte finish;
and finally finishing the inside of the split sections in clear epoxy resin laced with bronze flakes over black gloss paint and with clear poly gloss (a feature that doesn't show well in the pictures) on top.
I hope the photos appear - first time in my memory.
Thanks for organising an enjoyable challenge even if the gremlins prevent me from showing the members what I've made.
Regards
Stains: NW Guitars, Crimson, Unknown eBay powder stain supplier, Littlefair (the best by far),
Stainless steel rods: Amazon
Polishing compound: Meguiars
Build thread https://www.thefretboard.co.uk/discussion/219903/1q22-challenge-roland-s-guitar-build. I will need to adjust the setup as the guitar responds to being strung up. I may also have to play with the electrics because the 250 ohm pots I bought measure as 230 and 190 respectively.
For comparison, here it is alongside my main Telecaster.
Build thread is here https://www.thefretboard.co.uk/discussion/220148/1q22-challenge-dartmoorhedgehogs-solid-body-mandolin
Pickup-build thread if you're interested (although I made it a year ago so not really part of the challenge entry) https://www.thefretboard.co.uk/discussion/200740/frankenpickup
Edit: Found some strap buttons.
2 @elstoof ;
3 @Roland ;
Difficult choices, very well done to you all!
2. @Flip - really cool idea, not seen that done before
3. @downbytheriver - fantastic colour, and probably the one I'd most want to own
And the rest were all excellent - not at all easy to pick three, and even harder to decide on the order!
2 dartmoorhedgehog
3 paulnb57
was not easy! I could pick a different 3 tomorrow