

Howdy, Stranger!
It looks like you're new here. If you want to get involved, click one of these buttons!
Categories
- 243.2K All Categories
- 22 >> Start Here <<
- 12 New Members
- 8 FAQs
- 87.2K Gear
- 39.7K Guitar
- 3.4K Acoustics
- 1.3K Bass
- 14.7K Amps
- 17.3K FX
- 292 Digital & Modelling
- 767 Other Instruments
- 8.3K Making & Modding
- 423 Gear Reviews
- 107 Guitar Reviews
- 74 Amp Reviews
- 119 FX Reviews
- 87 Other Reviews
- 750 Made in the UK
- 977 Theory
- 1.9K Technique
- 2.1K Live
- 3.2K Studio & Recording
- 2.1K Making Music
- 225 Events
- 15 Guitar Show 2018
- 841 Plug My Stuff
- 105.9K Classifieds
- 41.4K Guitars £
- 2.8K Acoustics £
- 141 LH Guitars £
- 903 Basses £
- 10.6K Parts £
- 18.4K Amps £
- 34.3K FX £
- 2.8K Studio & Rec £
- 6.1K Misc £
- 466 Personnel
- 55.1K Chat
- 36.8K Off Topic
- 1.1K Tributes
- 6.6K Music
In this Discussion
Become a Subscriber!
Subscribe to our Patreon, and get image uploads with no ads on the site!
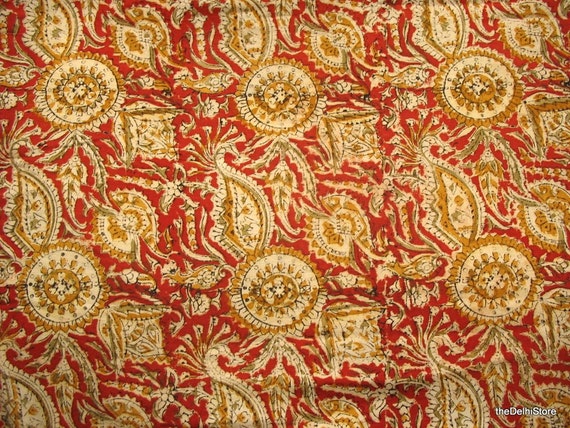
imalone, red and gold
I must be mad. Have just ordered this.
Oh, and some kind of guitar kit. It's currently being delivered to the wrong place of course.
Oh, and some kind of guitar kit. It's currently being delivered to the wrong place of course.
0 LOL 4
LOL 4 Wow! 0
 Wisdom
LOL 4 Wow! 0 Wisdom Base theme by DesignModo & ported to Powered by Vanilla by Chris Ireland, modified by the "theFB" team.
Comments
Odd is the name of the game, will go into the reasons later. Or in August...
In the meantime, one of these is on the way.
I may, or may not, get using it this weekend.
The fabric wont arrive till next week anyway, but was hoping to do a triage on the kit this weekend.
In the meantime I'm passing the time by augmenting the tone of some capacitors. Pictures later.
These are sprague metal film, so it's quite appropriate to convert them to colour coded versions, though I doubt anyone would confuse them with the originals.
Edit: I always find mixing orange a pain. The green stripe took maybe a minute to mix up, getting a vaguely correct orange took maybe ten and I had enough by the end of it to do a whole production run of capacitors.
Obviously the paint bands act as a dielectric array which helps to stabilise and condition the signal as it passes through the capacitor...
Fingers crossed this one makes it:
Edit: Arrived! Will see if I have time to give it a look over this evening. (If I can get it home, box is pretty big. Well packed at least.)
Edit edit: in the absence of a bounce smiley
Yes, it's an SG. This is with most of the packaging removed, neck, body and bits were each separated into their own compartment and seems to have protected it quite well.
One or two edges on the frets, and the nut is maybe stuck on a bit skew (first time I've really looked at a gibson style nut though).
Body
Finishing seems pretty good, rougher in cavities (fairly normal I think) and one or two little dark marks which may or may not be in the wood. Contouring seems okay, haven't looked over too closely yet.
I was going to think a bit more about whether I really want to go with the fabric or a more normal finish. It's a four piece, so a very transparent finish isn't going to work (you can see piece #2 is contrasts with its neighbours). I'm still wondering whether I should just go for a dark red.
Obligatory kisekae test:
Have been mulling over pickups, wont know what I want to do till I've tried putting everything together, but I've not had a P90 guitar yet, so may try a humbucker sized p90 in the neck.
To-do list: measure control cavity and see if a standard push-pull will fit.
Edit:
Ah, bridge and saddle pins. If I put these in to check it assembled, how hard is it going to be to take them out to work on the finish? Was just about to try bolting everything together.
Edit 2:
Think I've got it, small flat head screw or bolt dropped head-first down the middle of the insert, then screw in the post and it pulls the insert out. Stewmac do a tool, but looks like it's for threaded inserts while these have ridges. There is some suggestion that might not be wise on an SG thickness body though. More measuring...
My approach is that once they're in they're in. I will be doing all my finishing and putting in the inserts last (and not forgetting the earth wire!)
depends how much you care.... On particularly stuck in inserts I have grabbed a claw hammer and levered them out. totally the wrong thing to do, really risk of damage and the studs are useless afterwards
Usually i use a peice of rod in the holes and screw the insert down but I agree its not the best thing to do on a thinner bodied guitar. the stew-mac knob and bushing puller works well for any insert. it grabs the stud/height wheel, not the bushing itself. You can make your own fairly easily
or mock up a simpler version like this
http://www.instructables.com/id/How-to-remove-Tune-o-Matic-bushings-from-Les-Paul-/
Instagram
Thanks. Will maybe try mocking things up first before getting into finishing then. Look forward to a post on how it's all gone horribly wrong...
Electronics - obviously no idea how it sounds yet, but measured the pickups and one is 16k (bridge I suppose, haven't unwrapped to check labels), the other 12.3k. Surprisingly high. Pots are pre-soldered to wires and capacitors, so you wouldn't have to solder to pots unless you planned to change them or the wiring. Capacitors are green mylar, which is good, but 47nF, which is surprising given the pickups, so my "customized" bumble-bees are almost certainly going in.
Was surprised to find a 8ft cable included, it's pretty thin, doubt anyone would use it long term, but interesting dedication to providing everything you might need. The truss rod allen key was hiding with it. I've tried shaking the bag just in case they hid a practice amp away in there too.
Since I don't have the right bits around to make an improvised insert puller I've decide to start on the finishing rather than spend time putting things together just to take them apart again...
Just before last coat of mod podge:
Contemplating using the back of the fabric for the back of the guitar (this will give me twice as much, right?
Still thinking about this bridge... the posts and inserts are not tightly machined, there's wobble when not screwed right down. Don't know if that's a sign I should just replace them before starting.