Next Project ... opinions? ... & updates!

What's Hot
24567

Comments

  • GuitarMonkeyGuitarMonkey Frets: 1883
    Looks like a through neck too, looking at the end grain around the strap button.
    0reaction image LOL 0reaction image Wow! 0reaction image Wisdom
  • TTonyTTony Frets: 27612

    Had some workshop time today.  Back to work tomorrow :( so likely to be the last bit of workshop time for a while ...

    1.  Wrap the neck up *before* damaging it!

    image

    2.  Got the cap thicknessed, jointed and glued-up.  Birds eye maple.

    image

    3.  Quick template to guide the chambering.  Yes, I decided to hollow out the body.

    image

    4.  Use the drill press to get rid of most of the wood.

    image

    5.  Then tidy it up with the router.  OK, so no-one's going to see it, but still!

     image

    6.  Now I can start to take the 7mm off the top ...

    image

    7.  This is the router bit I use for the thicknessing.  It's a beast.

    image

    8.  Job just about done - nice crisp edges now - and the neck is still intact too (I cheated, and used a very small bearing guided cutter to do the area around the neck.  The bearing ran against the binding on the fretboard so it was safe.image
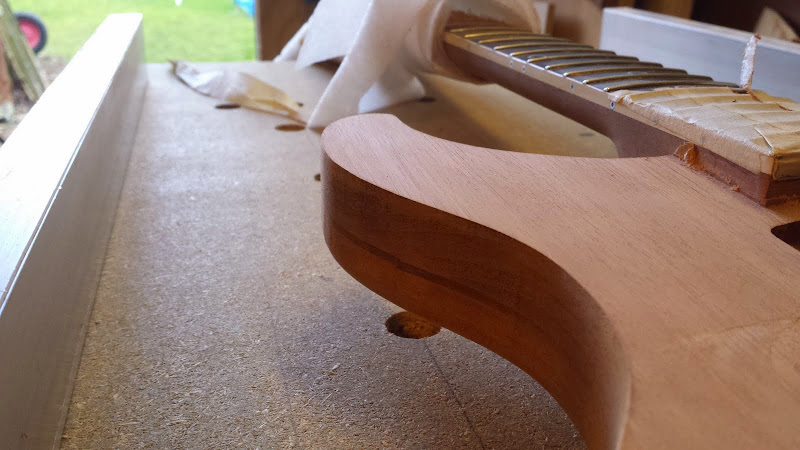
    9.. Tiny bit of tidying to do, but just about there.image


    Next, I've got to cut out the slot in the cap for the neck/fretboard, and then glue that on.  I might do some prep work on the "wedge" shaping of the cap *before* I glue it in place - just be easier to work on it without the neck getting in the way.

    I did make rather a lot of sawdust.


    Having trouble posting images here?  This might help.
    0reaction image LOL 5reaction image Wow! 0reaction image Wisdom
  • JalapenoJalapeno Frets: 6393
    Awesomesauce !!!!!
    Imagine something sharp and witty here ......

    Feedback
    0reaction image LOL 0reaction image Wow! 0reaction image Wisdom
  • WezVWezV Frets: 16725
    That's something I didn't consider- did you hit carbon fibre bars?

    Looks good so far. Make sure to cut the neck slot in the top before you cut the top to the outline
    0reaction image LOL 0reaction image Wow! 0reaction image Wisdom
  • Shark_EyesShark_Eyes Frets: 377
    Looking good. Next stage should look even better.
    0reaction image LOL 0reaction image Wow! 0reaction image Wisdom
  • TTonyTTony Frets: 27612
    WezV said:
    That's something I didn't consider- did you hit carbon fibre bars?

    Possibly just the last fraction of a mm, but nothing that hindered the tiny router bit that I was using at the time.

    WezV said:
    Looks good so far. Make sure to cut the neck slot in the top before you cut the top to the outline
    My thinking is ...
    1.  Mark out the rough outline of the cap and cut - leaving plenty of overhang around the edges.  This will probably be an off-centre join because of the defect in the top left corner of the cap.  It's a lot bigger on the other side of the cap, so will get worse as I carve it.  If I place it off-centre, I avoid that problem (plenty of width to work with).
    2.  Thickness the cap to the wedge shape - a wedge from 7mm at the neck to full height in the middle and then flat to the end of the body.
    3.  Make an accurate template for the neck area.
    4.  Use the template to cut the neck slot and fit.
    5.  Glue cap to body (route wiring channels in top of body *before* gluing cap on!)
    6.  Cut the cap to body shape accurately.
    7.  Start carving the shape into the top.
    8.  Carry on carving the shape into the top.
    9.  Still carving the shape into the top.

    ;)

    Happy with progress today.
    Having trouble posting images here?  This might help.
    0reaction image LOL 0reaction image Wow! 0reaction image Wisdom
  • TTonyTTony Frets: 27612
    edited March 2015
    @guitargeek62 - thought you might like to see this too  
    ;)
    Having trouble posting images here?  This might help.
    0reaction image LOL 0reaction image Wow! 0reaction image Wisdom
  • WezVWezV Frets: 16725

    difficult choice, i think i would rather have a centered top with a flaw than a non-centered top with no flaw

    also, flipping it over and carving the flaw smaller may make more sense - especially if its near the horns where the top will be thinner anyway.

    be really nice if it could end up in the cutaway
    0reaction image LOL 0reaction image Wow! 0reaction image Wisdom
  • TTonyTTony Frets: 27612
    WezV said:
    flipping it over and carving the flaw smaller may make more sense - especially if its near the horns where the top will be thinner anyway.

    Unfortunately, the flaw is *larger* on the under-side of the cap, so as I thickness/carve the top, the visible flaw will get larger rather than smaller  :(

    I *might* be able to position it over the control cavity though, and perhaps get a control knob over the top of it ... that's a possible.

    The top isn't hugely figured and I was going to use a semi-opaque finish on it, so an off-centre join shouldn't be too obvious.  But I'll play around with the options some more before I cut it to shape.
    Having trouble posting images here?  This might help.
    0reaction image LOL 0reaction image Wow! 0reaction image Wisdom
  • WezVWezV Frets: 16725
    edited March 2015
    yeah, but the top isn't book matched is it, so you could flip the whole top over.  then you start off with a large flaw  on the face and thickness/carve it smaller.  unelss there is another reason the underside needs to be the underside?
    0reaction image LOL 0reaction image Wow! 0reaction image Wisdom
  • GuitarMonkeyGuitarMonkey Frets: 1883
    Sounds like a job for a "Cremona Burst" perhaps?
    0reaction image LOL 0reaction image Wow! 0reaction image Wisdom
  • WezVWezV Frets: 16725
    edited March 2015
    Sounds like a job for a "Cremona Burst" perhaps?
    its pretty much why gibson used a dark burst on some guitars which were all supposed to be the same colour
    0reaction image LOL 0reaction image Wow! 0reaction image Wisdom
  • Shark_EyesShark_Eyes Frets: 377
    I'm with Wez on the centred join, even with a flaw it'll look nice.

    Alternatively, you could put a strip of another wood down the middle, and have the maple cap like wings? I'm not sure how it would look, but it's a consideration, especially if you only needed a cm or so for the flaw to not be a problem.
    0reaction image LOL 0reaction image Wow! 0reaction image Wisdom
  • Andyjr1515Andyjr1515 Frets: 3127
    That's some impressive progress in a very short time @TTony ; :)
    0reaction image LOL 0reaction image Wow! 1reaction image Wisdom
  • TTonyTTony Frets: 27612
    WezV said:
    unelss there is another reason the underside needs to be the underside?
    There is - it's got a few marks and discolourations on it.  You could make it a "feature" on some tops, but I'm thinking of doing something very plain and light-coloured (Wutone White if it takes well on a maple scrap that I'll test it on first) and the marks would be a distraction.


    Alternatively, you could put a strip of another wood down the middle, and have the maple cap like wings? I'm not sure how it would look, but it's a consideration, especially if you only needed a cm or so for the flaw to not be a problem.
    Actually, if I'd thought of that *before* I jointed and glued it, that might have been a neat solution.


    It might be that I can position the flaw over the control cavity and stick a knob on top of it - that's probably the best solution option given where it's at now.


    That's some impressive progress in a very short time @TTony ; :)
    Thanks Andy.  

    I'm back at work tomorrow  :(  so I knew that I had to make as much progress as I possibly could today, 'cos it'll be a while before I get the luxury of a clear day for workshop time again.  

    It also helps that I've got a lot of the tools, jigs and templates that I need now.  When I started this game, I'd spend more time making templates/jigs than making guitars - now that early time investment is paying off.
    Having trouble posting images here?  This might help.
    0reaction image LOL 0reaction image Wow! 0reaction image Wisdom
  • Shark_EyesShark_Eyes Frets: 377
    Ah ok, I'm glad that it at least wasn't a terrible idea.

    Looking forward to the progress on this.
    0reaction image LOL 0reaction image Wow! 0reaction image Wisdom
  • Shark_EyesShark_Eyes Frets: 377
    0reaction image LOL 0reaction image Wow! 0reaction image Wisdom
  • TTonyTTony Frets: 27612
    Bit of time to do some work on this today.  And the sun is shining which means that I can make a mess in the garden rather than in the workshop!

    Step1 - set up my thicknessing jig, but raise the far end by 7-8mm so the router will cut a wedge shape.
    image

    2.  After a few passes, you can see the top end of the piece is getting cut whereas the bridge area (where I marked the line) is untouched by the router.
    image

    3.  The wedge is taking shape ...
    image

    4.  And just about there ... 
    18mm at the bridge
    image

    10mm at the far end
    image

    Next jobs;
    - cut out the body shape reasonably accurately
    - make an accurate template for the neck join and then cut the neck join into the cap
    - glue cap to body - I want to get to that stage this afternoon if possible, then it can be left to set overnight.
    Having trouble posting images here?  This might help.
    0reaction image LOL 0reaction image Wow! 0reaction image Wisdom
  • WezVWezV Frets: 16725
    edited March 2015
    awesome stuff  - seems to be working out quite well so far

    whenever I have done similar neck slots in caps i have routed it with rounded corners and squared up the corners by hand - usually means I can use a neck pocket template to do most of the work.   

    normally i am doing it to attach full frontal a cap to a through neck guitar, rather than trying to save an incorrect neck angle.  its mostly what i did on this one, but it needed a bit more shaping by hand because of the angles

    just found some pics of the neck as it was last time i saw it
    0reaction image LOL 0reaction image Wow! 0reaction image Wisdom
  • TTonyTTony Frets: 27612
    I've really enjoyed the workshop time today.  

    Great to be doing something practical and tangible, that needs a little effort and thought, and which turns out (eventually) reasonably well!  I want a job like that ...

    Anyways;

    Made the neck join template and used that to cut out the cap, having also roughly shaped the cap to the body shape.
    image
    image

    Ideally, I'd have liked something a tiny bit closer, but we're talking fractions of a mm, and I'm thinking a bit of maple dust and woodglue will fill any gap that's there once it's glued in place.

    There is a slightly bigger problem though ... I didn't take enough off the top when I thicknessed / wedged it.  The top of the cap is just about level with the top of the fretboard, which means that there's not enough clearance by the time the strings get to the bridge.

    So, out with the thicknessing / wedging jig again!

    I guess it's better to take too little off rather than too much.  But it's still a pita and wasted another 30mins (while I thought about it) and another 30mins while I actually did the job.  Took another 3mm off all over, so it should now work properly.

    @wezv - I used my smallest router bit to cut the neck cutout, and then took the remaining curve out with the razor blade that you see in the shot.

    Despite the lost hour, I still got to where I wanted to get to tonight - the glue-up shot;
    image

    Fingers crossed for the morning ...


    Having trouble posting images here?  This might help.
    0reaction image LOL 2reaction image Wow! 0reaction image Wisdom
Sign In or Register to comment.